DIY - Installation

DIY - Installation

Ready to try some simple plumbing tasks like replacing an old toilet or changing out an old showerhead? It’s easy if you follow the steps provided below.
- How to Install a Toilet
- How to Detect and Repair Toilet Leaks
- How to Change Out a Showerhead
- How to Change Out a Faucet Aerator
How to Install a Toilet
Watch these videos and follow the instructions provided with your toilet or the more general instructions provided below.
Toilet Replacement – Part 1
Toilet Replacement – Part 2
Toilet Replacement – Part 3
1. Remove your old toilet
- Shut off water supply - Before performing the task of toilet removal, make sure the water supply is shut off. The water supply tap is normally located in the line leading to the underside of the tank. If your toilet does not have such a tap, you will have to shut off the main water line in the house. Turn the tap clockwise to close. Once the water supply is shut off, flush the toilet as often as required to drain the water out.
- Disconnect water supply line - The next step is to disconnect the water supply line from the tank. You should see a nylon or brass fitting connecting the supply line where it enters the bottom of the tank. Using a wrench, undo the fitting turning counter clockwise. When loose you should be able to turn the fitting by hand. When the fitting is unthreaded from the tank, gently pull down on the line separating it from the bottom of the tank.
- Remove tie down nuts - You are now ready to remove the tie down nuts at the base of the toilet bowl. Looking at the base of the bowl, you will see two ceramic or plastic caps located one on each side. Using a flat screwdriver, gently pry up on the caps and remove. Using a wrench, remove the exposed nuts.
- Remove toilet from the floor - Once the nuts are removed you can now remove the toilet from the floor. With the tank lid off, lift up on the toilet detaching it from the floor. When lifted, try to hold the toilet level to prevent water trapped inside from spilling out and remove toilet from the bathroom. You may also be able to remove the tank from the bowl to lighten the lifting. Inquire about local toilet recycling programs to dispose of your old toilet.
2. Install your new toilet
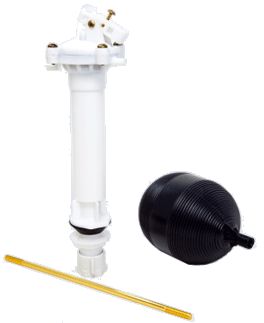
- Follow the instructions that came with your toilet - If you are installing a new toilet, it will have to be assembled and instructions should be included with the product.
- Mount tank on toilet base - Following the instructions, you will mount the toilet tank to the base using a rubber seal, two bolts with wing nuts, four metal washers and four rubber washers. To mount the tank, place the rubber seal around the hole on the bottom outside of the tank. The seal is flat on the tank side. Place the tank on the toilet base. Now put one metal washer and one rubber washer on each bolt. The rubber washer must be tight against the toilet. Insert the bolts through the inside of the tank and down through the base. Install the rubber washers, metal washers and wing nuts from underneath. Tighten the wing nuts alternately, being careful not to over tighten them as you could crack the toilet.
- Prepare the installation site - Inspect the floor flange making sure it is free from all wax from the previous seal. Remove any old wax with a putty knife. Check to ensure the flange is tight to the floor. Tighten or replace loose or rusted flange screws. Install new flange bolts and position the new wax ring center on the flange, narrow side up. Some wax rings come with a rubber boot that fits downward into the flange. You can also warm the wax ring before installation making it easier to work with. Make sure not to over heat and melt the wax ring.
- Place the toilet - Now carefully lower the toilet down onto the flange, guiding the bolts up through the holes in the base. Before installing the flange nuts, you will have to seat the toilet. Do this by pushing down on the toilet with one hand on each side of the bowl. Install the washers and nuts tightening by hand.
- Tighten the toilet to the floor - Using a wrench, tighten the nuts alternately giving each side a few turns being careful not to over tighten them. As the nuts are tightened, the wax seal compresses and the gap between the base of the toilet and the floor will close. Install new caps to cover the exposed bolt ends. You may have to cut the bolts off if they are too long.
- Reconnect supply water - Next, reconnect the water line to the bottom of the tank and tighten the fitting. Turn the water supply on and when the toilet fills with water, flush and check for any leaks. As a finishing touch you can run a bead of caulking around the base of the toilet where it meets the floor.
How to Detect and Repair Toilet Leaks
Toilets are one the most common sources of leaks in the home, and usually go unnoticed because the leaks are often silent and out of view. Several research studies have found 20% to 35% of all residential toilets leak to some degree. Large toilet leaks can be detected when the valve constantly emits a hissing or gurgling sound when the toilet is not in use.
Inspect
To begin looking for leaks remove the tank lid and inspect the flush mechanisms. The water level in the tank should be no higher than 1 inch below the top of the overflow tube. If the water level is to the very top of the overflow tube, water is slowly leaking into the overflow tube and down the drain. The problem has one of three causes: 1) the water level is adjusted too high; 2) the float is damaged and not shutting off the refill valve; or, 3) the refill valve (ball-cock assembly) is worn and needs replacement.
Simple Dye Test
You can perform a simple dye test to check for leaks in the flapper valve. Place dye tablets or a couple drops of food coloring into the tank water to give the water color. If the colored water appears in the bowl within 15 minutes, there is a leak in the flapper valve. Leaks occur when the flapper valve does not create a watertight seal. The seal can be compromised due to several reasons: a) the chain snagging, not allowing the flapper to drop completely onto the valve seat; c) the valve seat is worn; or c) the flapper is worn or warped. A worn flapper is the most common cause by far, and can be easily replaced.
Inspect for Leaks, Perform Dye Test, and Replace a Flapper
How to Change Out a Showerhead

Showerheads normally connect to a 1/2-inch threaded shower. When putting on a new showerhead use Teflon® tape on the end of shower pipe to prevent leaking. Use masking tape on the chrome pipe to protect the finish from being scratched when using wrenches or pliers. Use vise grips or a pipe wrench and a pair of pliers to remove the old showerhead and screw on the new one. Once a year remove and clean out the showerhead to prevent mineral deposits from building up in the showerhead and distorting the shower stream.
How to Change Out a Faucet Aerator

A faucet aerator attaches to a faucet at the point where the water comes out. The aerator disperses water into tiny droplets helping to conserve water and provide a "softer" flow of water.
Aerators are simple to install, requiring only to be screwed onto the faucet head. The best way to change an aerator is to unscrew the one that is on the faucet, and bring it with you to the hardware store to find the correct replacement. Once you have purchased the appropriate aerator you will need to screw it onto the faucet. Hand tightening should be adequate. If water leaks around the threads, give it a fraction of a turn with pliers.
Change Faucet Aerator
Change Faucet Aerator or Showerhead